Introduction :

Epoxy resin is a versatile material, which makes it an ideal feature for artists and craft lovers to work with.so art can be used to make things for daily use that have a special touch of art, such as tables, clocks, paintings… .
Having a wonderful epoxy river table designed in wood according to your own taste in your home is really nice, it is not that difficult. After the tutorial this article, you will be able to create your own design table and favorite river colors step by step.
What we will need :
- Epoxy resin (and mixing materials…).
- Flat pieces of wood.
- Colors (use the type that suits you).
- Angel grinder and wire wheel.
After preparing the workplace and the materials that we will need, let’s begin to simplify the points one by one :
Wood piece processing :

1. Firstly choose a good flat wood pieces.

2. Flatten your piece of wood until you have a flat surface.


3. Remove soft wood using angle grinder and wire wheel.

4. Cut your wood based on the size of your table, after layout a random design with a pencil or chalk.

5. Seal the edges to prevent the epoxy from staining the wood.
Create the mold :

- Using flat pieces of wood, build a template that matches the frame you designed.

2. Cover the corners well with silicone, Thus covering the small holes to prevent leakage of the resin.
3. Apply one layer of release agent wax inside the mold. then, leave it for about 20 minutes, to avoid sticking the epoxy on the mold.

4. Make sure that your mold is on the level before pouring your resin, using Water weighing scale.
After that, Put the pieces of wood you prepared in advance on the mold you prepared, and Install the pieces of wood on the surface of the mold so that the wood does not float on the epoxy and to maintain the same design.
Epoxy pour :


- Pour your epoxy and the hardener, mix very well with adding your chosen color.
2. Leave it for 10 minutes to allow air bubbles to float up, then use a heat gun to get them out.


3. Pour it in the mold once or in layers, wait about 10minutes for bubbles to be on top, then pop them with a heat gun,
4. repeating the same process after each layer (if you are working on several layers).
After completing all these steps, let it cure for about 3_4 days, so you can remove your table from the mold.
flatting and polishing :

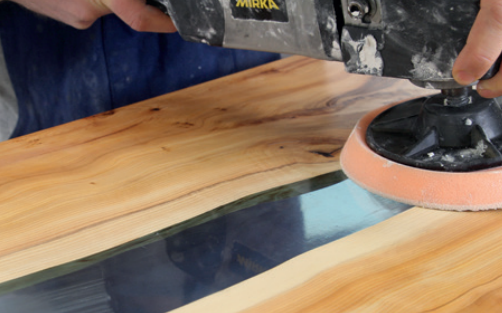
After unmolding the board that will become a table, flatt it with a belt sander while maintaining the level, make sure that there is no small holes, if they are, fix and finish them (using the glue is a good choice) then sanding.. .
Now the time of polishing. We need a shiny look for this piece of art, so you can use any method that suits you. we suggest using osmo hardwax, repeat it many times till you get the desired result (as you can use any other Polishing Compounds). Or add another layer of epoxy on it, it will become glossy without polishing.
conclusion :
Finally, install the steel table base you already create and make your table ready.Now your table is ready, enjoy watching your own art touch  .
.
contact us:
For more ideas and inspiration please follow us on Instagram : @epoxy.sadik / @wood.sadik
